This document guides you through how to update the firmware on an RPI inverter.
Required Tools
- Laptop (running Windows), fully charged
- USB-RS485 converter cable (can be purchased from your distributor) and driver (downloadable here)
- Upgrade Tool software (downloadable here)
- Inverter Firmware (downloadable here)
- Screwdriver
Before Heading Out
- Is the upgrade software correctly installed on your laptop?
- Is the USB – RS485 driver installed and does your laptop recognise the converter cable?
- Ensure you have the firmware on your laptop
Steps
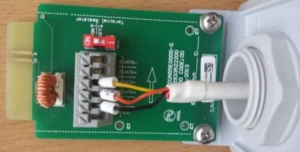
- Connect the USB – RS485 cable to the connector block as follows:
 Yellow → Data –
Orange → Data +
Black → GND - Turn on DC and AC of the inverter. During firmware update DC and AC power must be turned on (minimum 150 V DC).
- Ensure that you have the correct firmware files at hand.
- Open the upgrade tool by double clicking on the icon.
- Load firmware file by clicking “load file” button and select the FW *.hex file you want to update. (Alternatively you can drag the Firmware file onto the window)
- Search inverter by selecting the virtual COM port and pressing “play” button. You can check the assignment of COM port with your device manager.
If you don’t know what COM port, you can find it here - Once the inverter has been found, select the inverter you want to upgrade and click the Upgrade button to start the process.
- After upgrading, please check the firmware version on your inverter screen. The message “succeeded” or “please check firmware” will appear.
- Update the remaining DSP/RED and/or COMM *.hex files if necessary.
